

How To Install Rancho Steering Stabilizer
| This is a film of all the parts yous will get with your new Rancho steering stabilizer. | 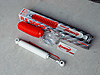 |
| Using a pair of needle nose pliers, remove the cotter pin going through the mounting stud and castellated nut. |  |
| Considering I am not a big fan of excessive force when it comes to my Jeep, I recommend using a pitman arm puller similar the one shown higher up to remove the existing mounting stud. | 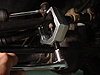 |
| Assemble your new mounting stud parts as shown in the photo higher up. | 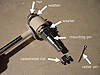 |
| Here'due south what it should look similar once properly mounted on to your drag link. | 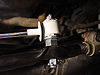 |
| It may exist quite tight to get a socket wrench to fasten this end and so be sure to take box wrenches on hand. |  |
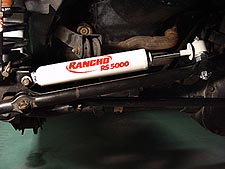
After installing a tall lift and bigger tires on your Jeep TJ, it's a skilful idea to upgrade your factory steering stabilizer with something a niggling more heavy duty. It's not completely necessary to do and so but it's cheap and it will help smooth out bad some road manners caused past fat tires and provide more than control in the event of a blowout. About any aftermarket stabilizer will work great and I accept no brand preference here. I went ahead and purchased a Rancho because it was cheap ($40).
NOTE: If you lot are considering a steering stabilizer because your Jeep has Expiry Wobble, don't botther getting one. You need to be checking the torque setting on your trackbar mounting bolt and brand sure to get an front alignment. Your toe setting is well-nigh probable off.
What You Volition Demand
• Rancho Steering Stabilizer Office#RS5407
• Metric Socket Set/Wrenches (15mm, 18mm, 19mm)
• Ratchet
• Torque Wrench
• Pitman Arm Puller
• PB Blaster
Installation
ane. Park on level ground and spray your manufacturing plant steering stabilizer bolts with some Atomic number 82 Blaster. two. Using a pair of needle nose pliers, remove the cotter pin and then the castellated nut using a 19mm socket.
three.
I am not a big fan of excessive force when it comes to working on my Jeep. Therefore, I recommend using a pitman arm puller like the 1 shown in the pic to the left to remove the existing mounting stud in your drag link. I bought ane for $14 merely y'all can borrow one for free at Autozone. Simply slip on the puller tool over the drag link and place the threaded bolt over the mounting stud. And then, crank the bolt with a ratchet until the stud pops out. 4. Using a 15mm and 18mm box wrench, remove the bolt and nut attaching the existing stabilizer to the axle. v. At present, open upwardly your package of parts and gather them onto the new Rancho steering stabilizer as shown in the flick to the left (Washer and mounting pin through the bushing, washer on reverse side and so fastened with nut). Do not torque whatever of the nuts at this time. 6. Skid your new Rancho sttering stabilizer into the mounting subclass on the beam end, slip in the mounting bolt and loosly thread on the nut. vii. Attach the new mounting stud into your tie-rod and so fasten the castellated nut to 35 ft. lbs. of torque (as recommended by Rancho). Insert the cotter pin through the stud and bend back with pliers. Torque the upper mounting nut to 30 ft. lbs. of torque. eight. Tighten the axle mounting bolt and nut to 55 ft. lbs. of torque.That'southward it! You only finished installing your new Rancho steering stabilizer. As you lot will notice in the main photograph above, I choose to apply the Rancho lable merely not the red shock boot that comes with the kit. I'm non a big fan of daze boots as they just collect mud and gunk just on your Jeep, yous can do any y'all desire :)


Source: https://4x4xplor.com/steeringstabilizer.html
Posted by: tollivermiltary.blogspot.com
0 Response to "How To Install Rancho Steering Stabilizer"
Post a Comment